Need a Teachable tutorial?
You’re in the right place. The course creation platform Teachable is one of the best course builders out there. And today, you’ll learn how to create and sell an online course with Teachable.
Want to learn more? Read on!
Should you use Teachable to set up your course?
First and foremost:
Is Teachable the right platform for you?
Should you use an alternative platform… or even build your own platform?
And, most importantly, are online courses worth the hype?
That’s what we’ll look at next.
Why should you create an online course?
Did you know that the e-learning market is huge (and growing fast)? In 2020, it was sized at approximately $250 billion.
A self-study online course is a great way to build a highly scalable income source and create flexibility and freedom for yourself.
By creating a course, you create an asset you can sell over and over without additional production costs. And because you sell your courses digitally, it’s one of the most profitable business models out there.
Creating your own, profitable course is completely doable. I’ve helped hundreds of people build and scale their online course businesses. Many of them make multiple six-figures from their courses while enjoying their lives, traveling, spending time with their families, and building an even bigger legacy by growing their businesses.
Because yes, your online course can help you have a bigger impact in the world. Teaching someone how to do something they’ve been dreaming of possibly for years is powerful. And depending on what you teach, your course can help people completely change their lives.
That being said, how do you get started creating your course? First, let’s find out if Teachable is the best platform for you.
Is Teachable the best online course platform?
I’m a big fan of Teachable, which happens to be one of my long-term partners. I’m their go-to speaker for all things online courses and online business and I love speaking at their Teachable Summits.
They’re the only course hosting software I recommend. Why? Because I know that everything they put out is at the same level of quality that I require of everything with my brand on it. (AKA I have high expectations.)
So far, I haven’t found a single competitor that is on par with Teachable. So if you’re considering Teachable vs Thinkific, Kajabi, or some other course platform, my strong recommendation is Teachable.
At the same time, I do want to be upfront—I don’t personally don’t use Teachable.
The reason is simple:
I run a multiple 7-figure business. A few years back, I wanted more control over my courses and their design, so I decided to create my own custom platform.
That said, I didn’t start out this way. Building a course platform is WAY more complicated and expensive than using a plug-and-play platform like Teachable. I don’t recommend it for anyone who’s just starting to sell their courses. (You need to invest at least high five figures or six figures, not to mention all the time and energy that goes into building one.)
What are the benefits of Teachable?
Why is Teachable then such a good option?
First, it’s incredibly easy to use. AND it includes all the tools you need for building a successful course.
The interface is user-friendly, and you basically create your entire course with the help of drag-and-drop tools. Plus, if you need help, their support is great.
It’s the only tool that includes features every course creator needs (from beginners to more advanced).
Do you need to use a course platform to create your course?
If you want a platform where you can upload your course, then Teachable is the platform I recommend. But it’s not the only alternative for course creators.
The thing is:
You don’t need to use a course platform if you’re new to selling courses.
An even simpler way to publish your course is to upload it to a private Facebook group. This is by far the most flexible alternative, plus, it’s free.
If you want to use this route, just create a Facebook group for your course and invite your students. Upload your course material to Units in the group or share your content as livestreams. This is what I did with my first course and it worked really well.
Creating and selling your course doesn’t have to be more complicated than that.
But for those who DO want to use Teachable, there are a few pricing plans you can choose from. Let’s take a look:
Teachable pricing
Teachable has four pricing plans: Free ($0/month), Basic ($39/month), Pro ($119/month), and Business ($299/month).
The biggest differences between the Free and Basic plans are that the Basic plan supports custom domain names and has lower transaction fees compared to the Free plan.
As the commission goes from $1 + 10% for the free version to 5% for the Basic version, a paid subscription will make sense with just a few sales. When you’re more advanced (AKA have sold at least a few courses), go for the Professional plan. It might ultimately help you save money.
Now you know why Teachable is a good choice. But how do you use it? Here’s a step-by-step Teachable tutorial.
How do you use Teachable to create an online course?
One of the benefits of Teachable is that it’s so easy to use. Your course won’t take more than a few hours to build and you’ll have access to all of the tools you need, like payment processing, sales pages, and so on.
The first step? Setting up your Teachable school.
Set up your school
The first step you need to take is to click on “Get started” on the Teachable homepage and create an account.
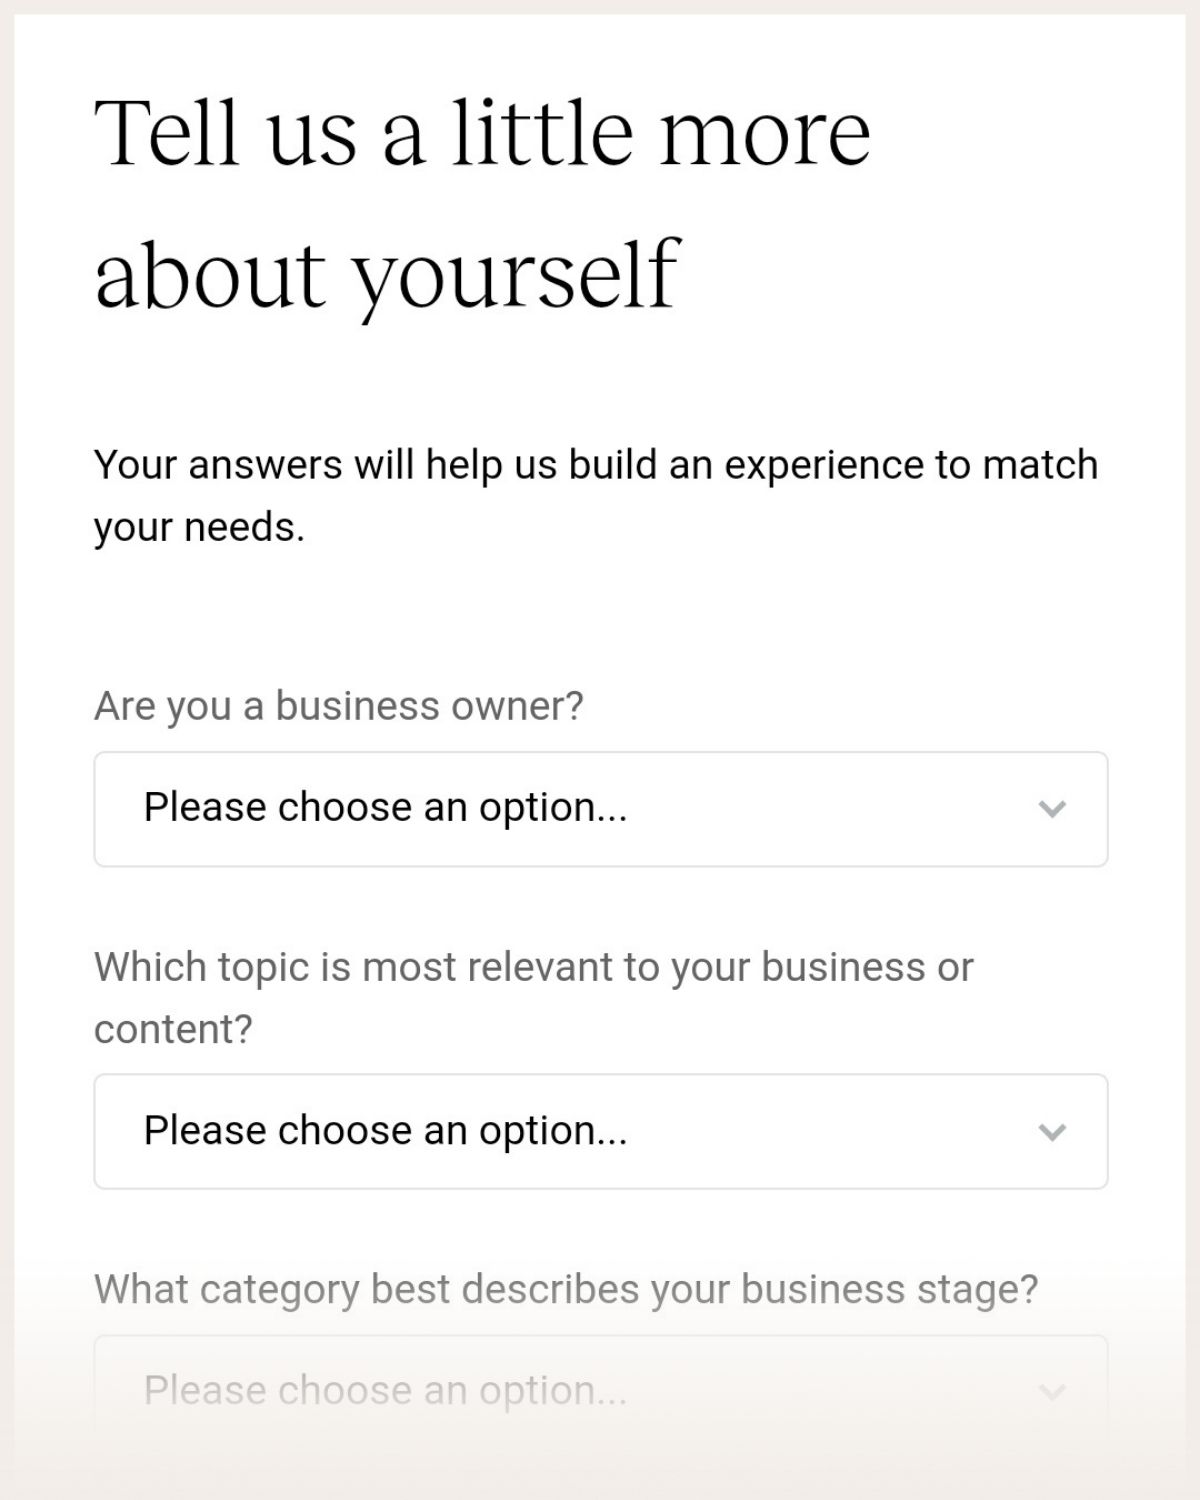
Once you’re logged in, click on “Create New School”. Name your school.
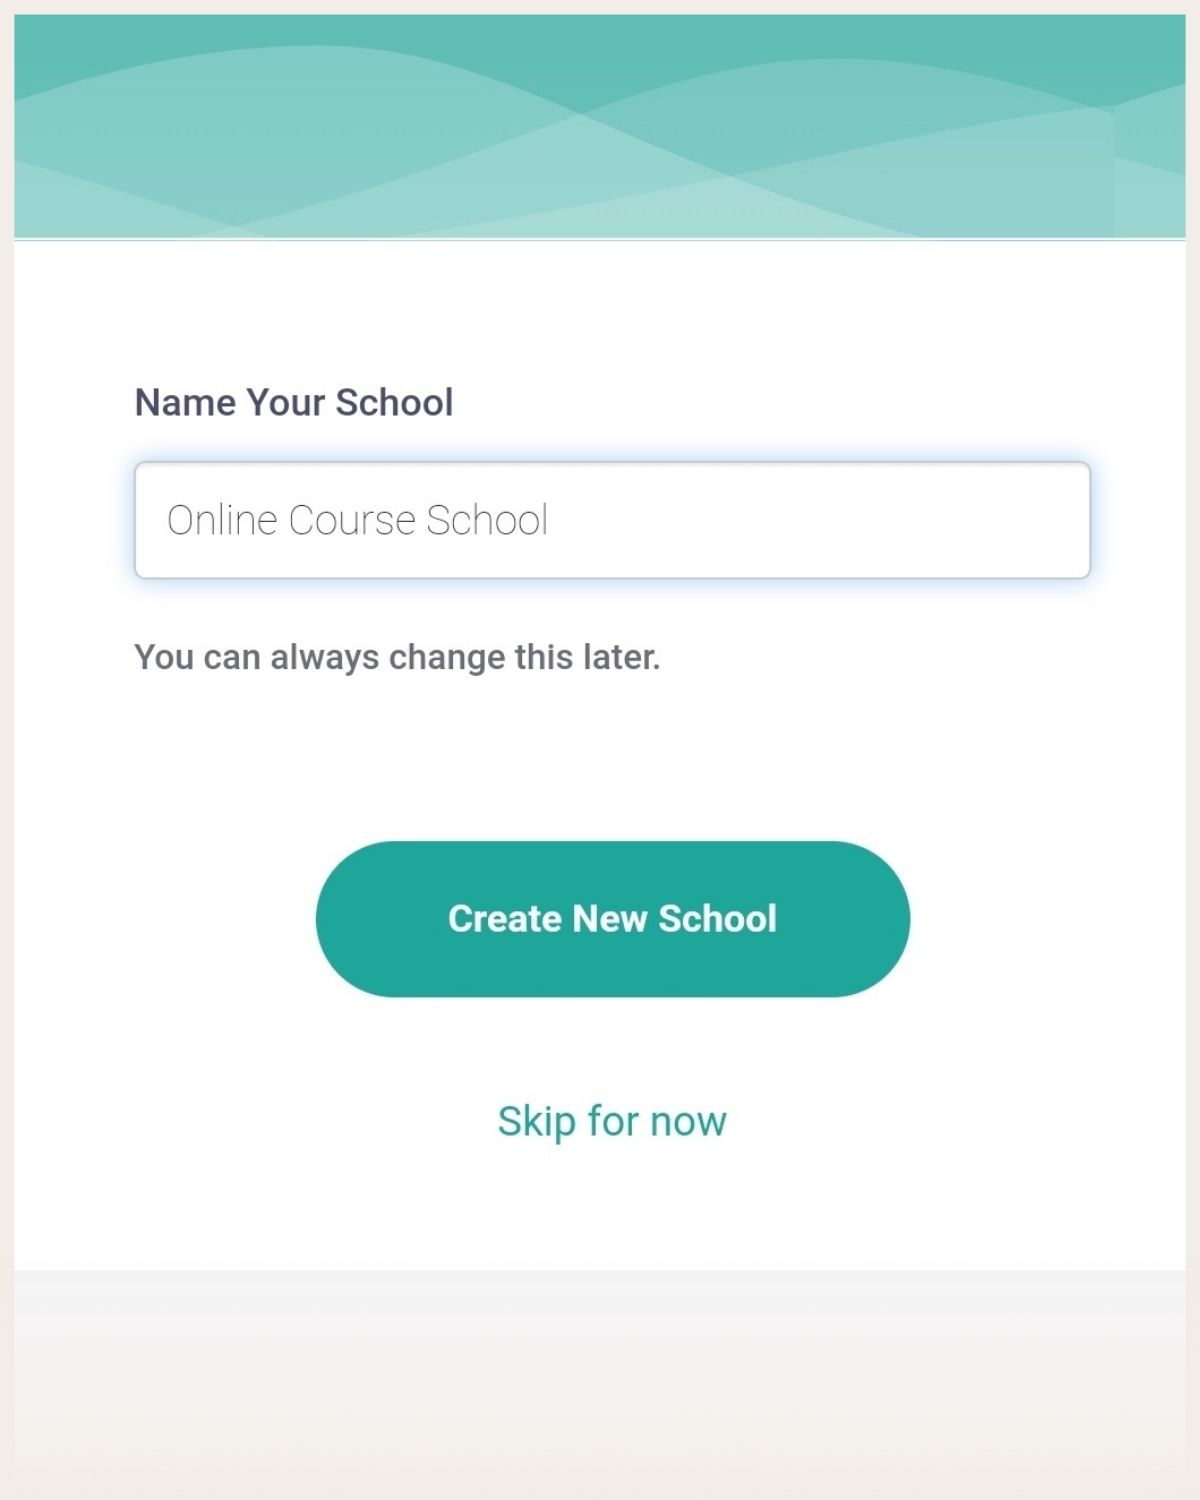
Then, fill in the questions.
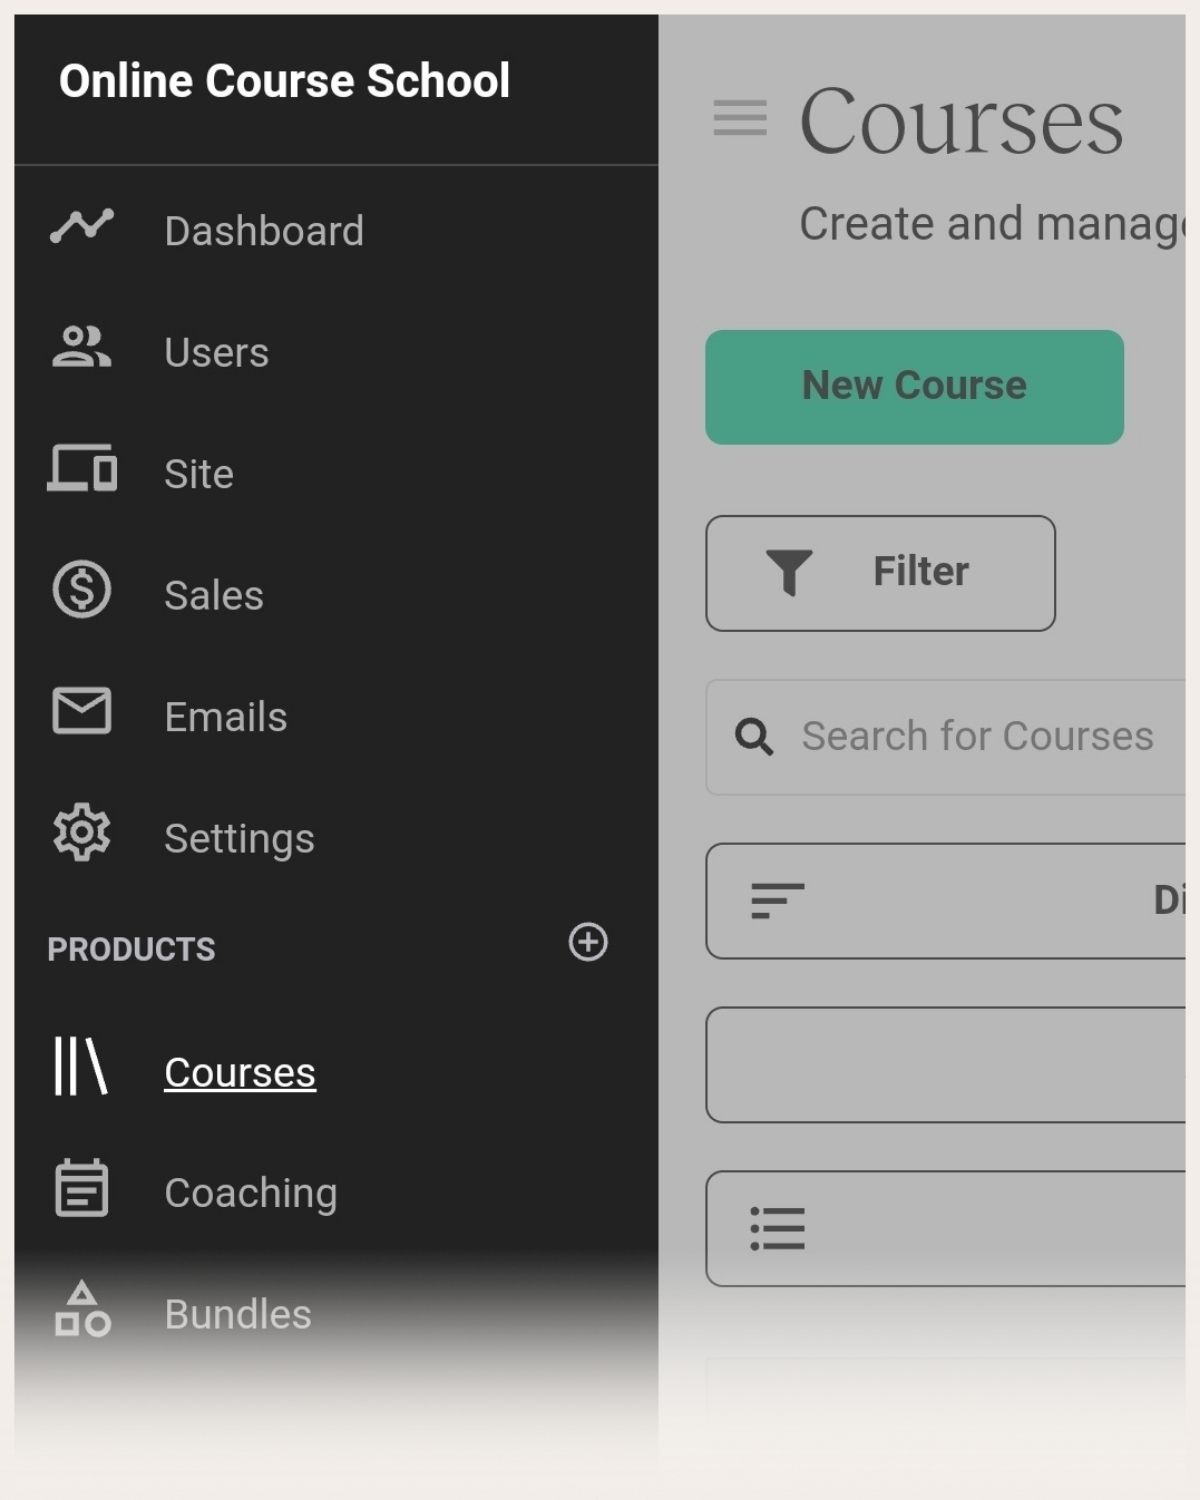
That’s it. Now you’ll be redirected to your dashboard so that you can create a course.
Create your course
To create a course, click on the “+” icon next to “Products” or click on “Courses” and “New course”.
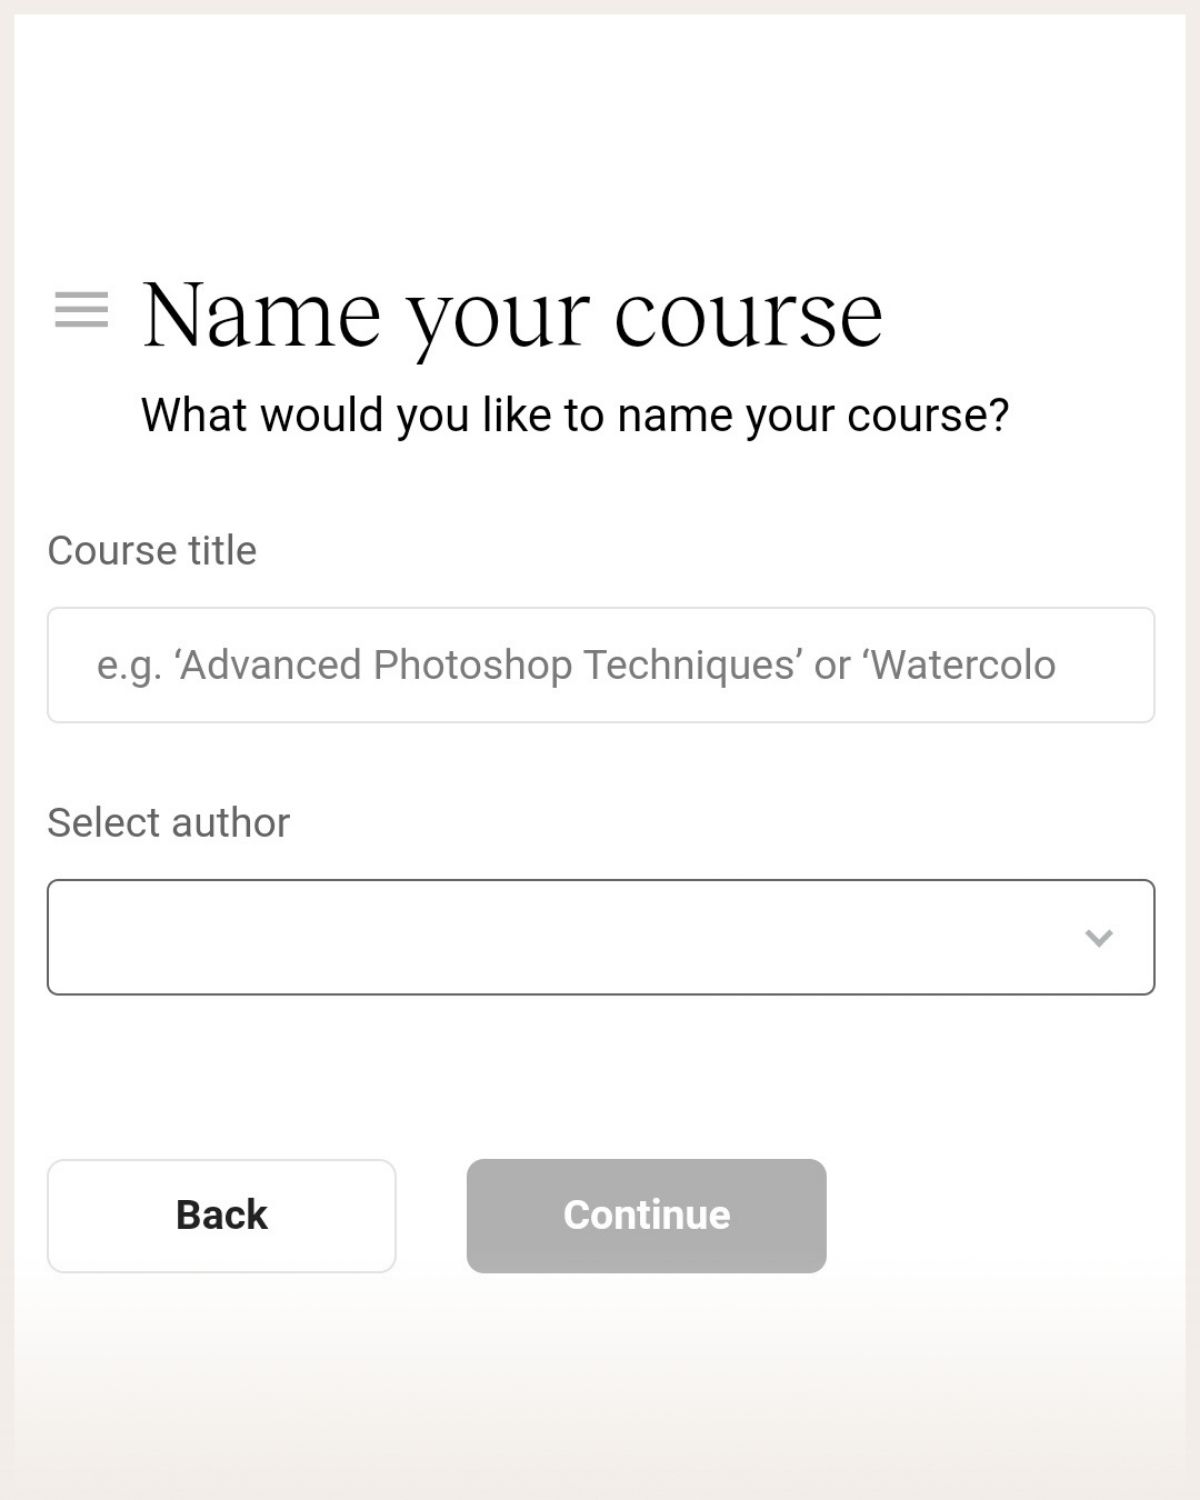
Give your course a name and select an author.
Go to “Information” in the sidebar to start the basic setup of your course.
Here you can publish, preview, and delete your course.
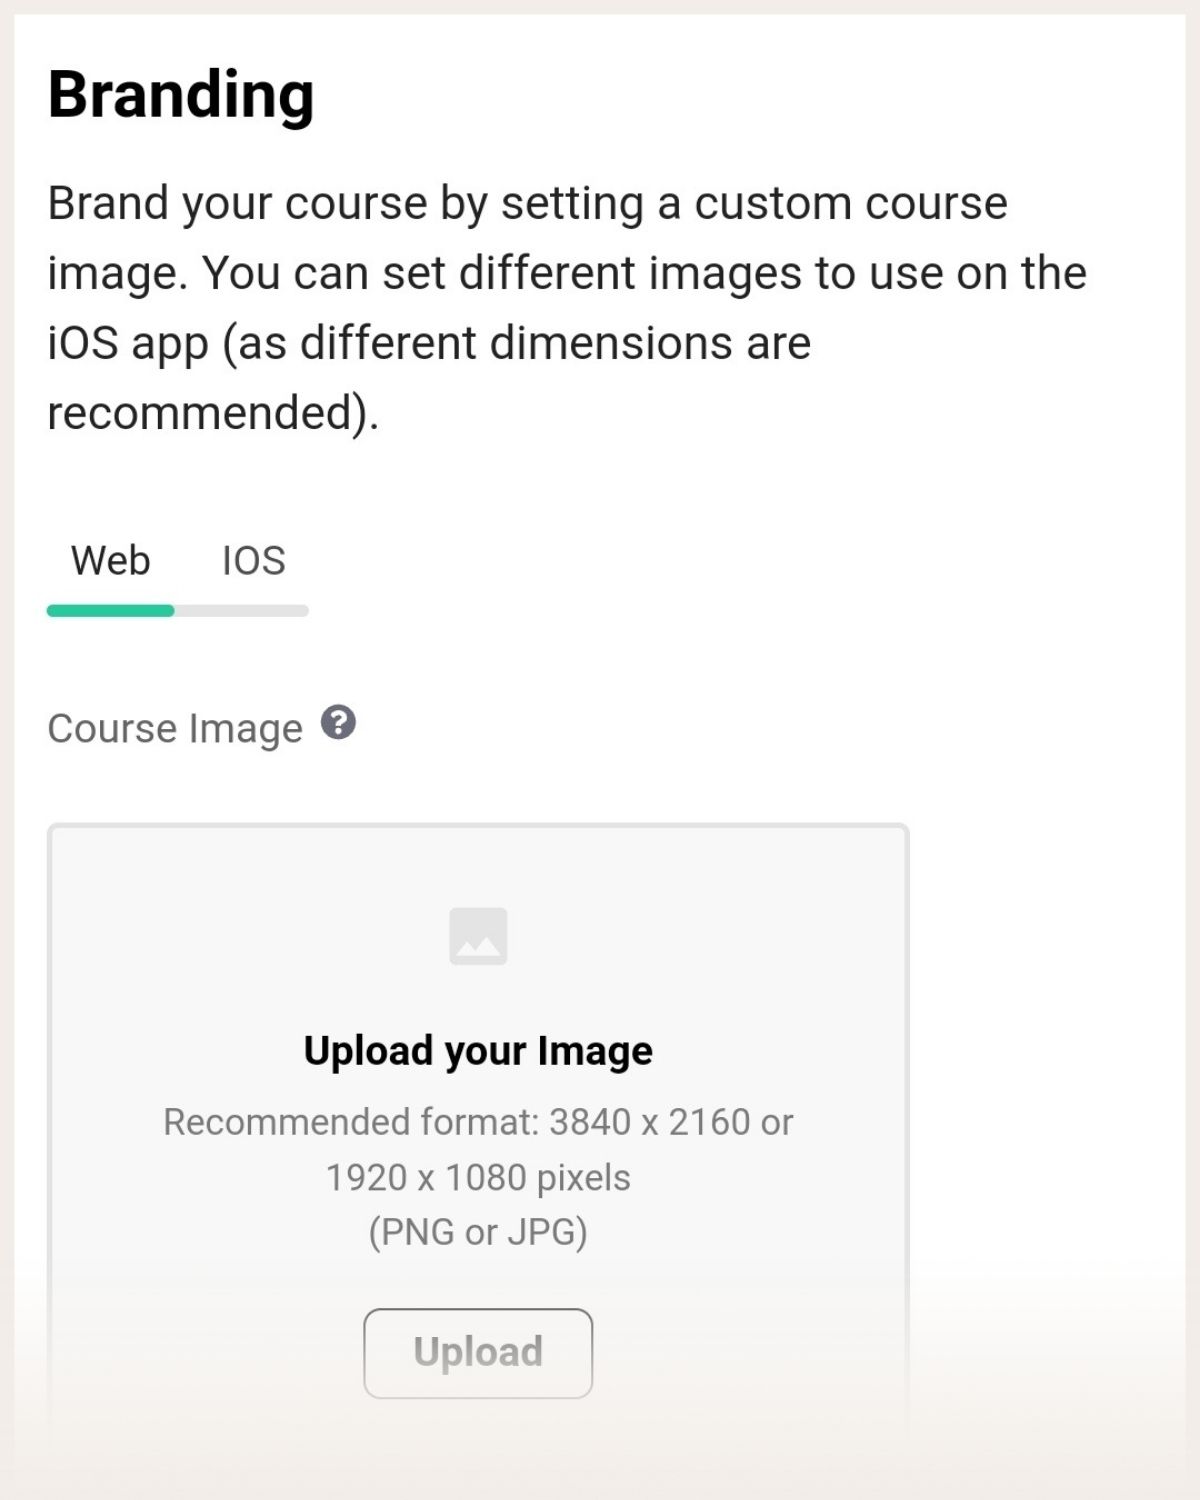
You can add a custom thumbnail logo, or an image that appears to students in the sidebar of the course curriculum or in the course directory. Your image should be a 2560x1440px JPG or PNG file type.
As different dimensions are used on the iOS app, you can also edit those settings. An iOS thumbnail image should be 300x300px JPG or PNG and a background image should be 1080x607px JPG or PNG.
You can also change your course information, including your course name, an optional subtitle, and categories that help students search in your course’s directory.

With paid plans, you can lock certain aspects of your course so that students have to complete steps to get access to them.
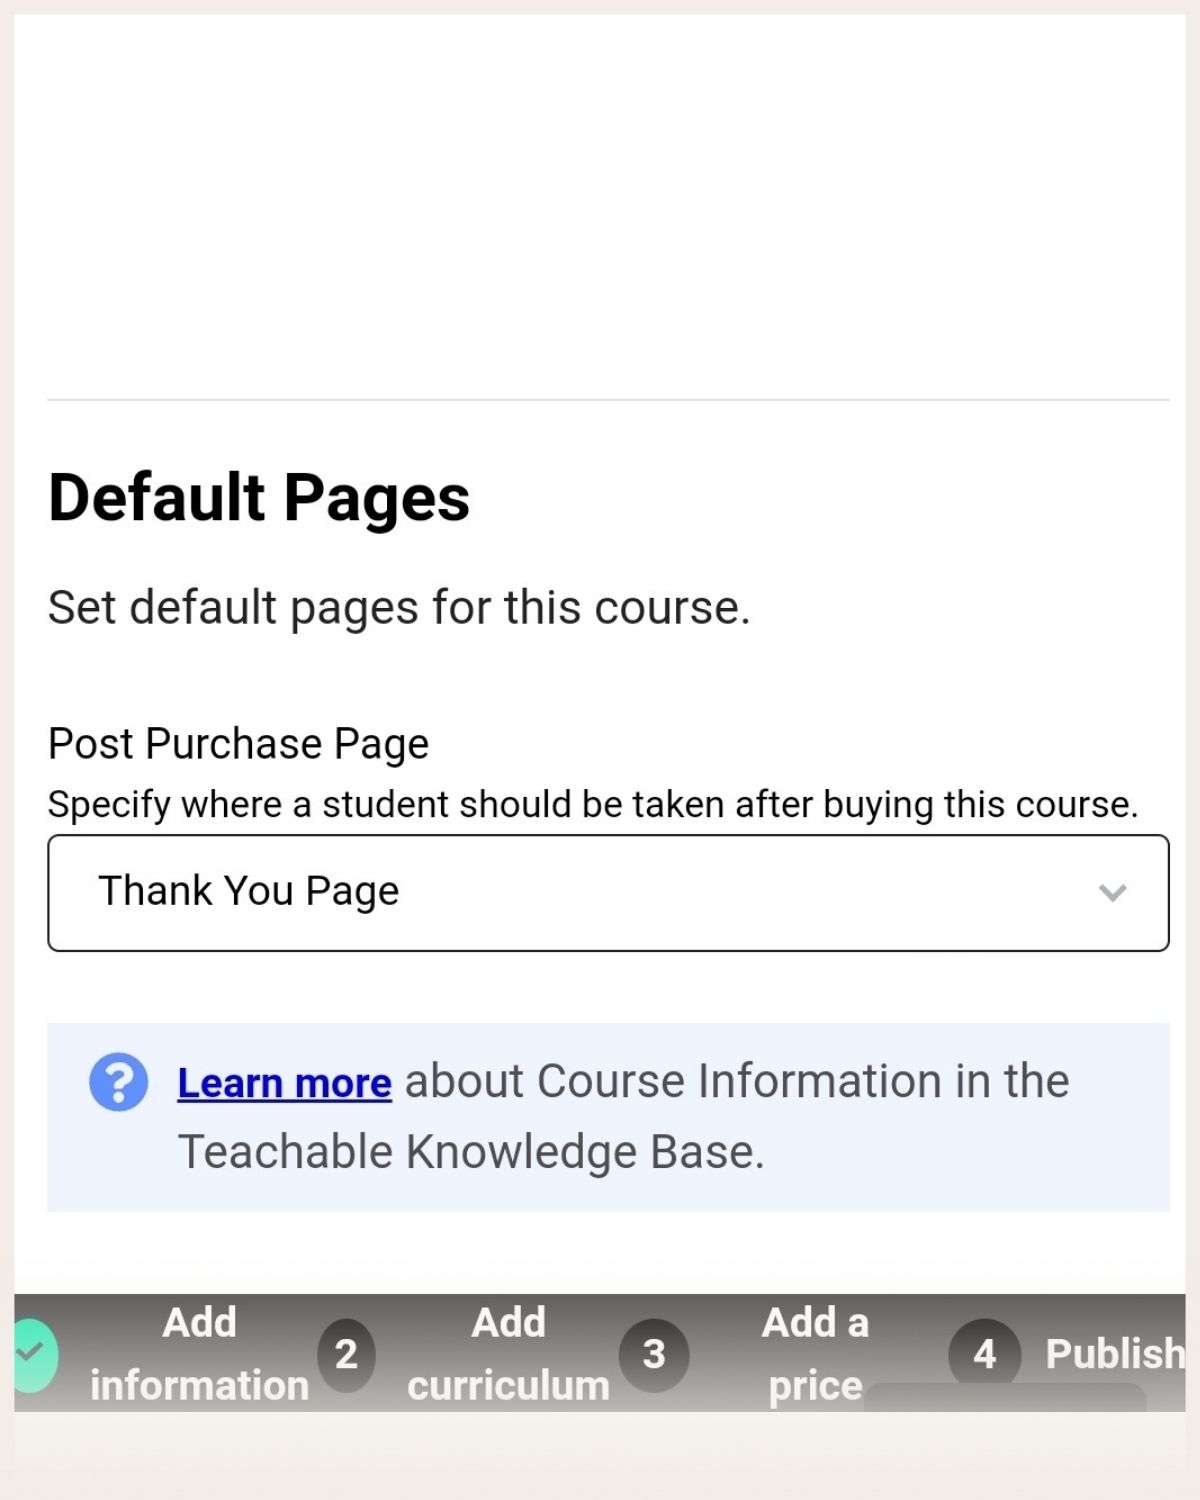
And finally, set the page you want students to be directed to when they buy your course. (Use the default thank you page here unless you have a different page in mind.)
Add course content
To add course content, click on “Curriculum”. However, before you add any content, you need to create sections and lectures. Sections include groupings of lectures (a module of course lessons) and lectures are course lessons.
Think of sections as a themed group of lectures. So if your course teaches students how to manage their personal finances, one section could be a group of lectures teaching students how to pay off debt, another could teach them how to save money, and a third how to invest money.
To create a section, click on “New section” and to create a lecture, click on the “Add new lecture” button within the curriculum overview.
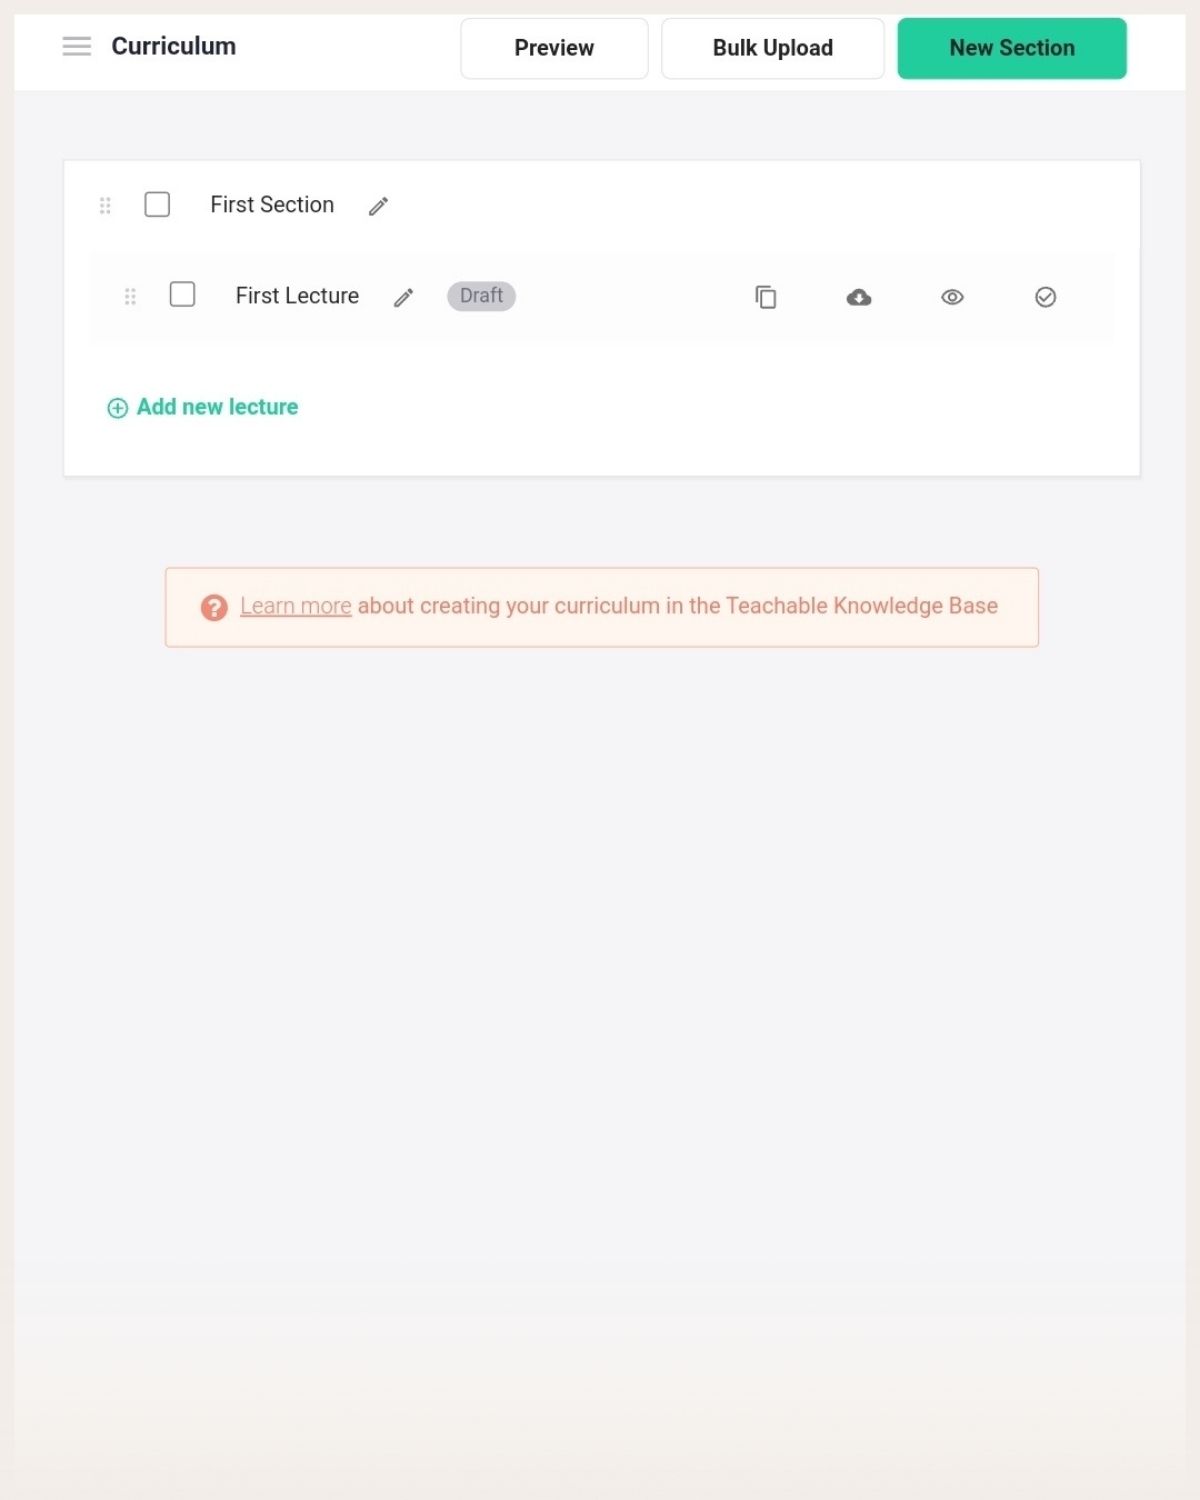
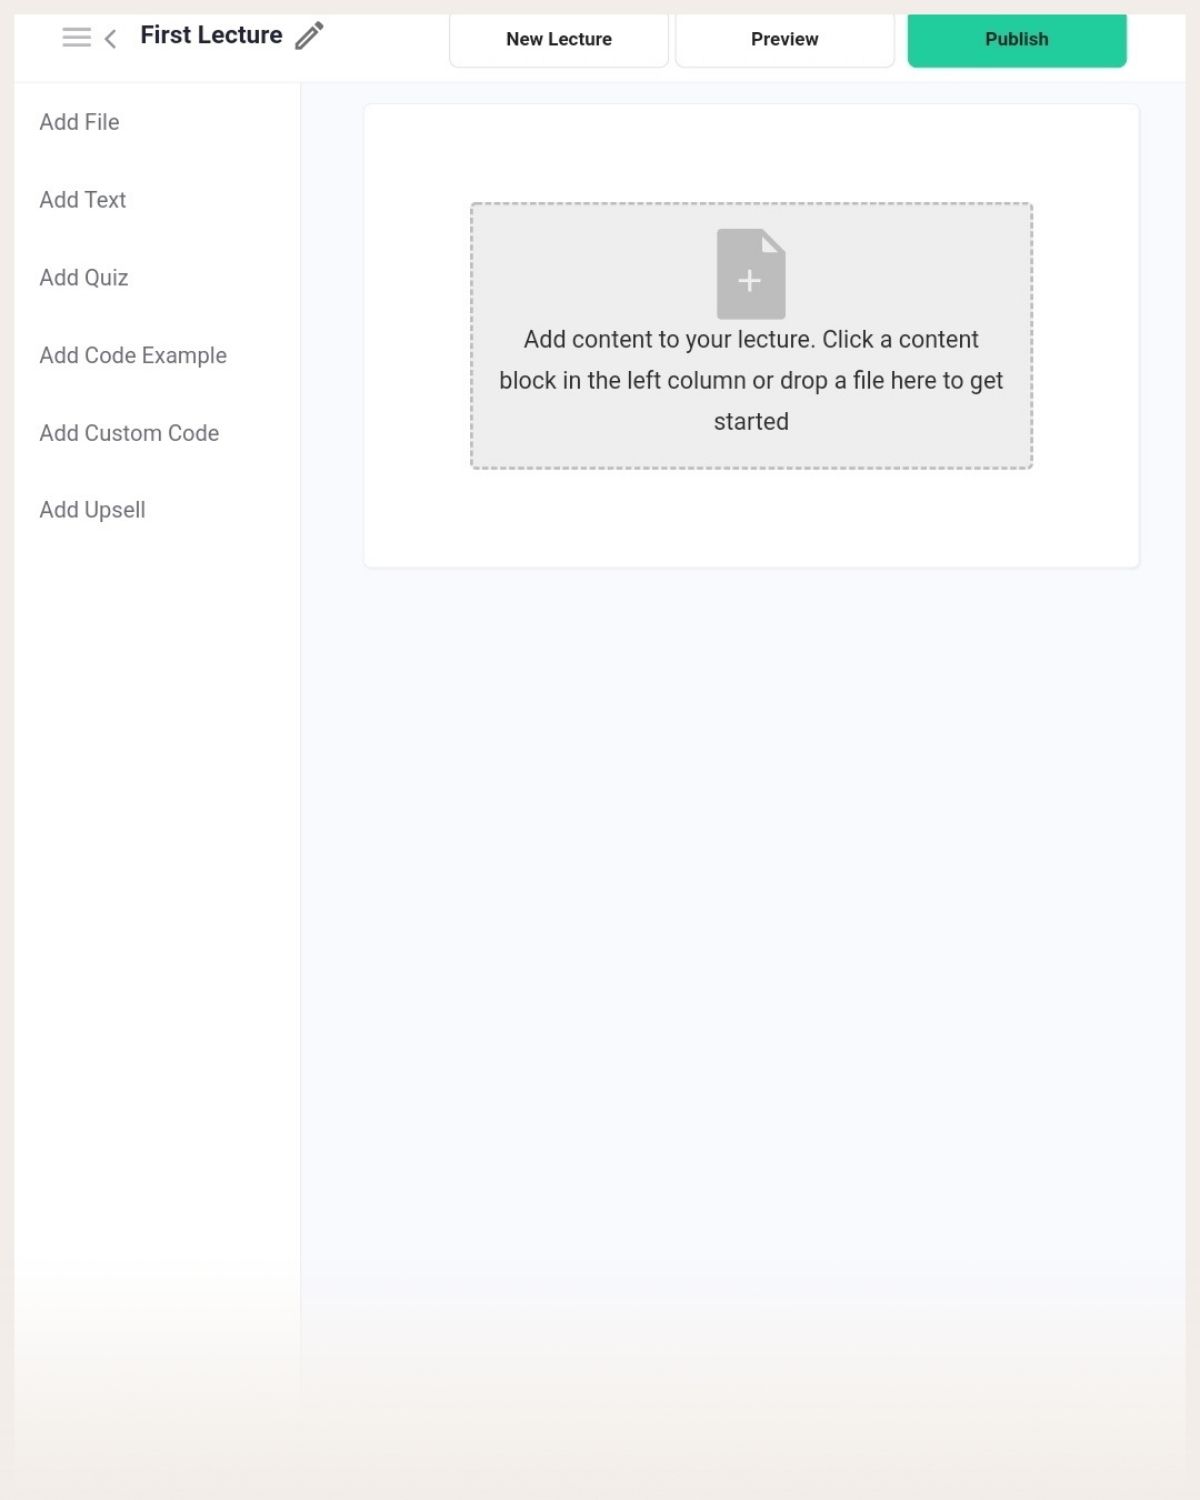
Click on the lecture you want to edit and add your course files. Note that PDF, video, audio, and image are the supported file types for any lectures. Other file types will be added as downloadable files.
You can also add text and quizzes to help students track their performance. Plus, you can add live video streams or embed YouTube videos in the “Custom code” section.
In the Lecture section, you can additionally add upsells and previews (so that you allow people to preview course lessons before buying it) and arrange and delete lectures.
Design your course
To design your course, go to “Site” in the sidebar and choose “Theme”. Here you can modify your school’s logo, branding, colors, and fonts.
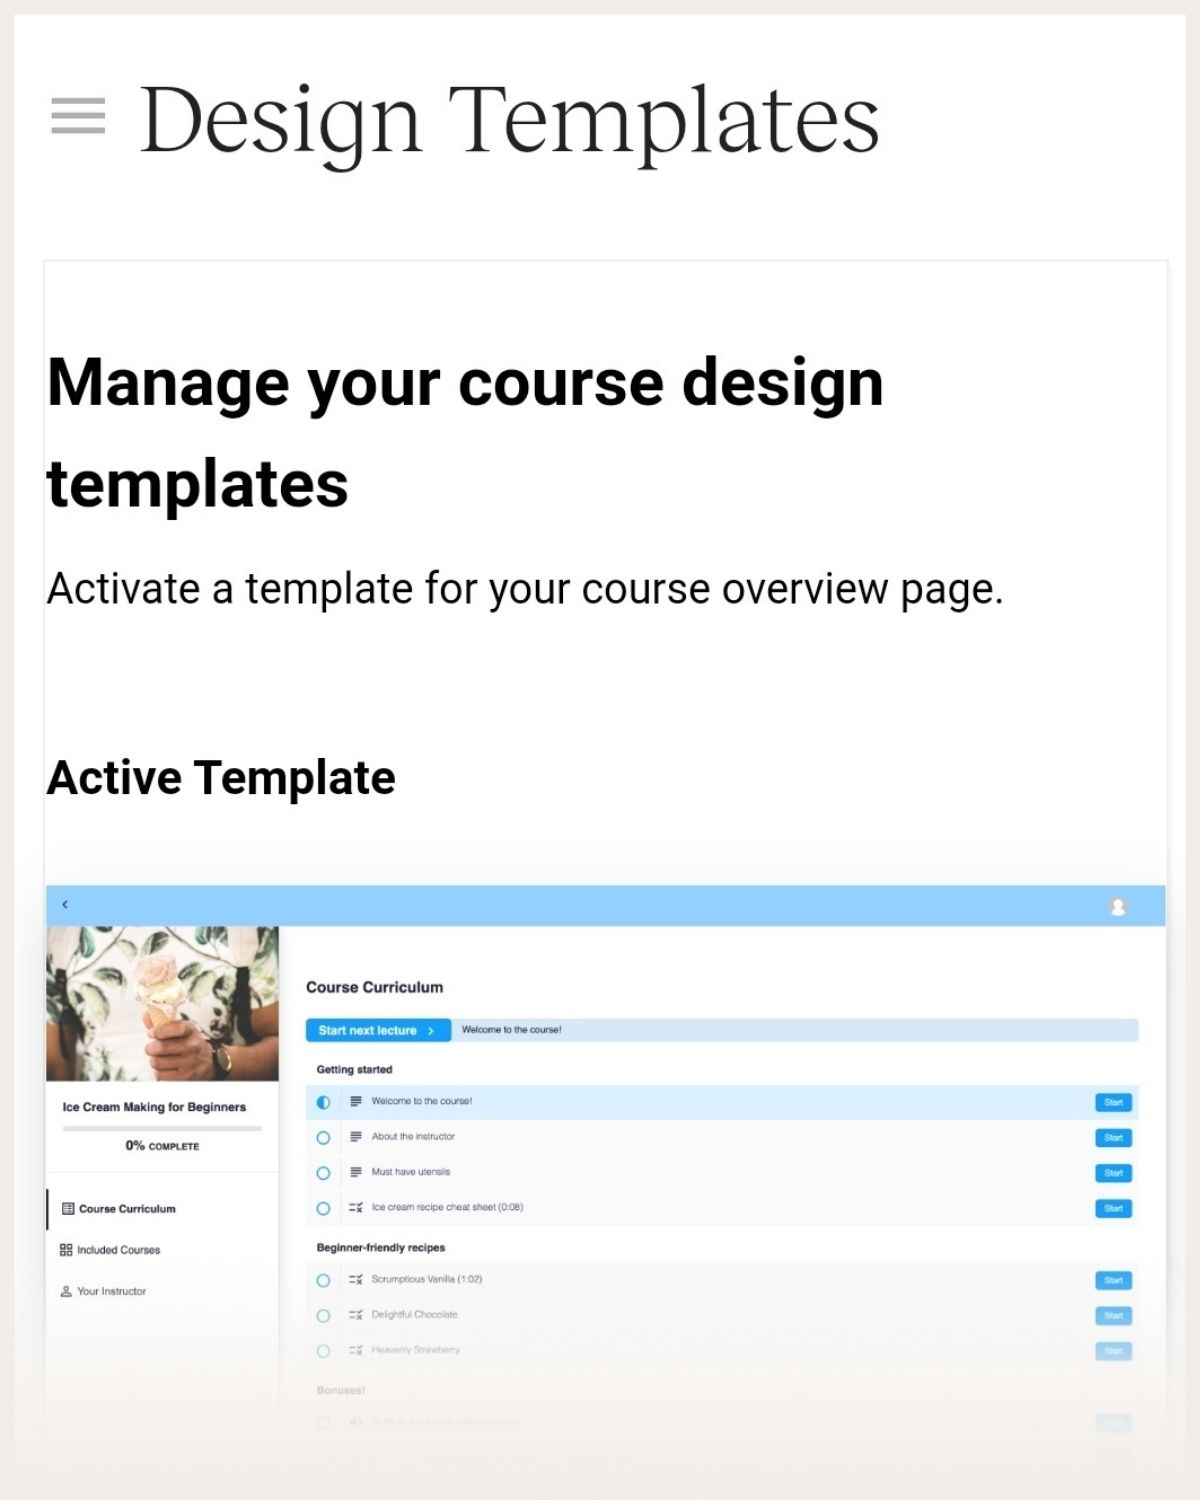
And to modify the design of your course page, go to “Curriculum” and “Design Templates”. You can choose between three templates: classic, simple, and colossal. Go with the default theme (classic) unless you want to change it up for some reason.
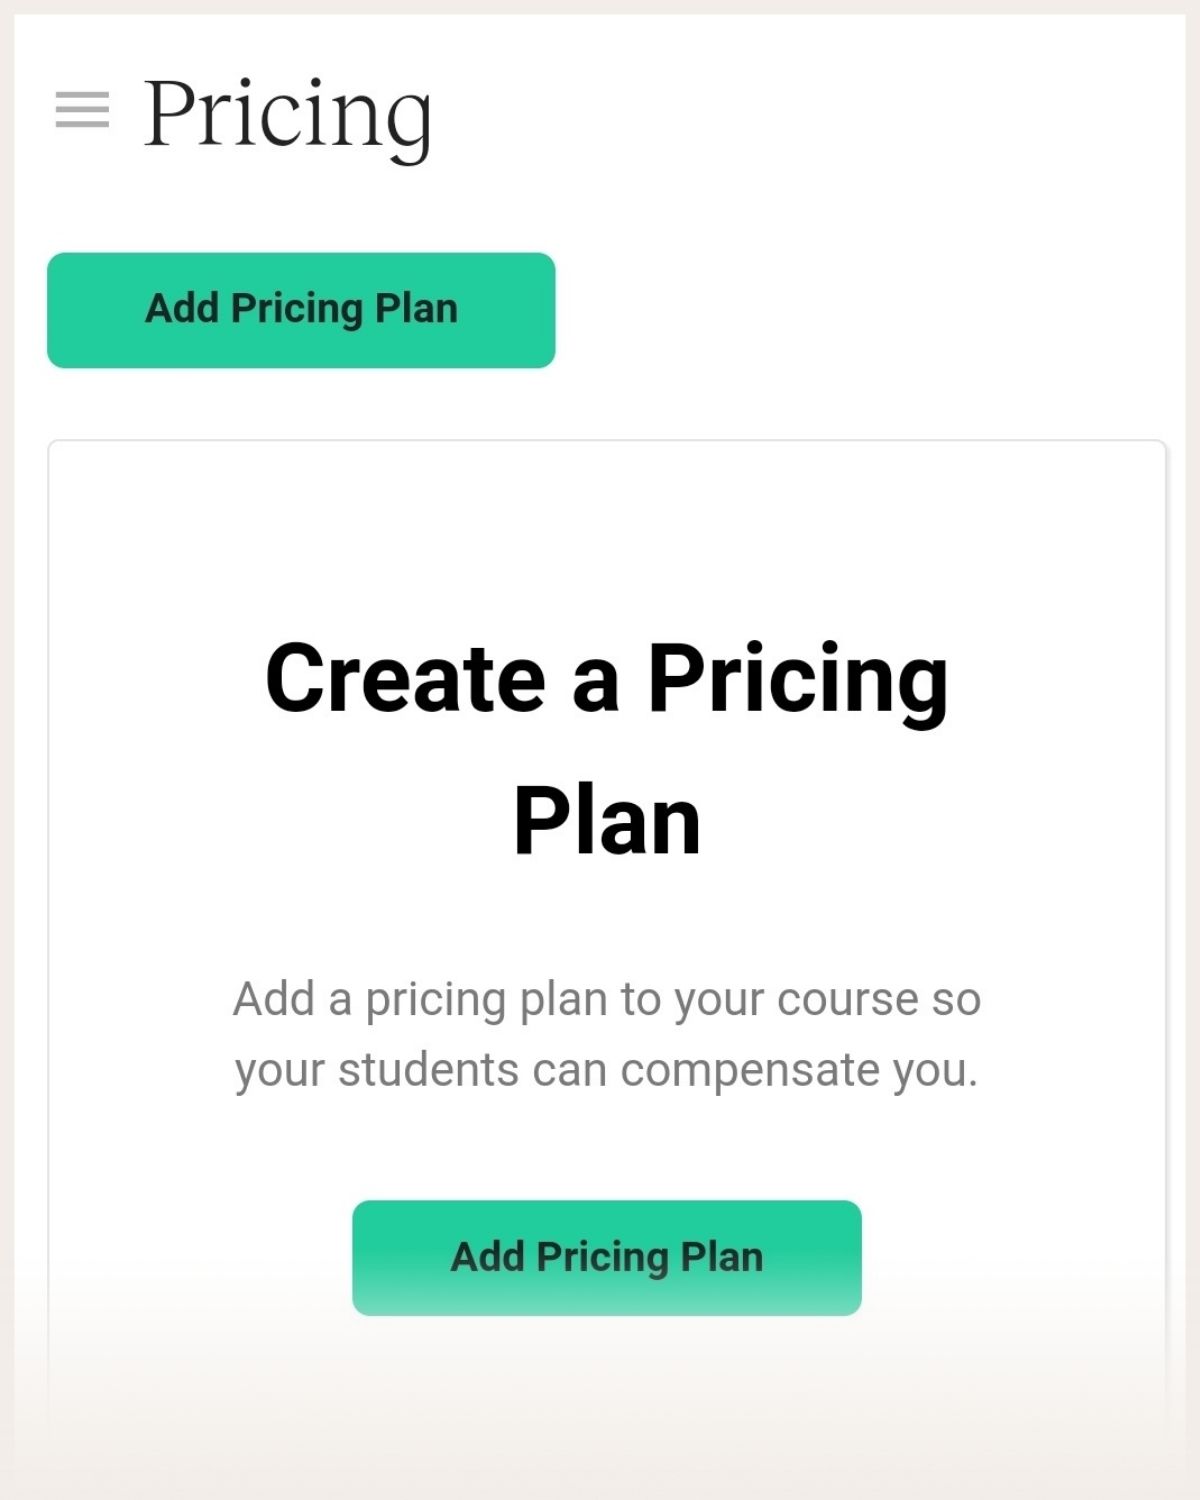
Price your course
Go to “Pricing” and “Add pricing plan”. There are four pricing options: free, one-time purchase, payment plan, and subscription.
Choose the pricing option you want to use. (First-time course creators should use a one-time purchase because in comparison to membership sites and similar, this is the most straightforward type of course to sell.) You can now set your price.
But what’s a good price range for your course?
A good price for a first-time course ranges from $47 to $497, depending on factors such as the results students can get, the course topic and so on.
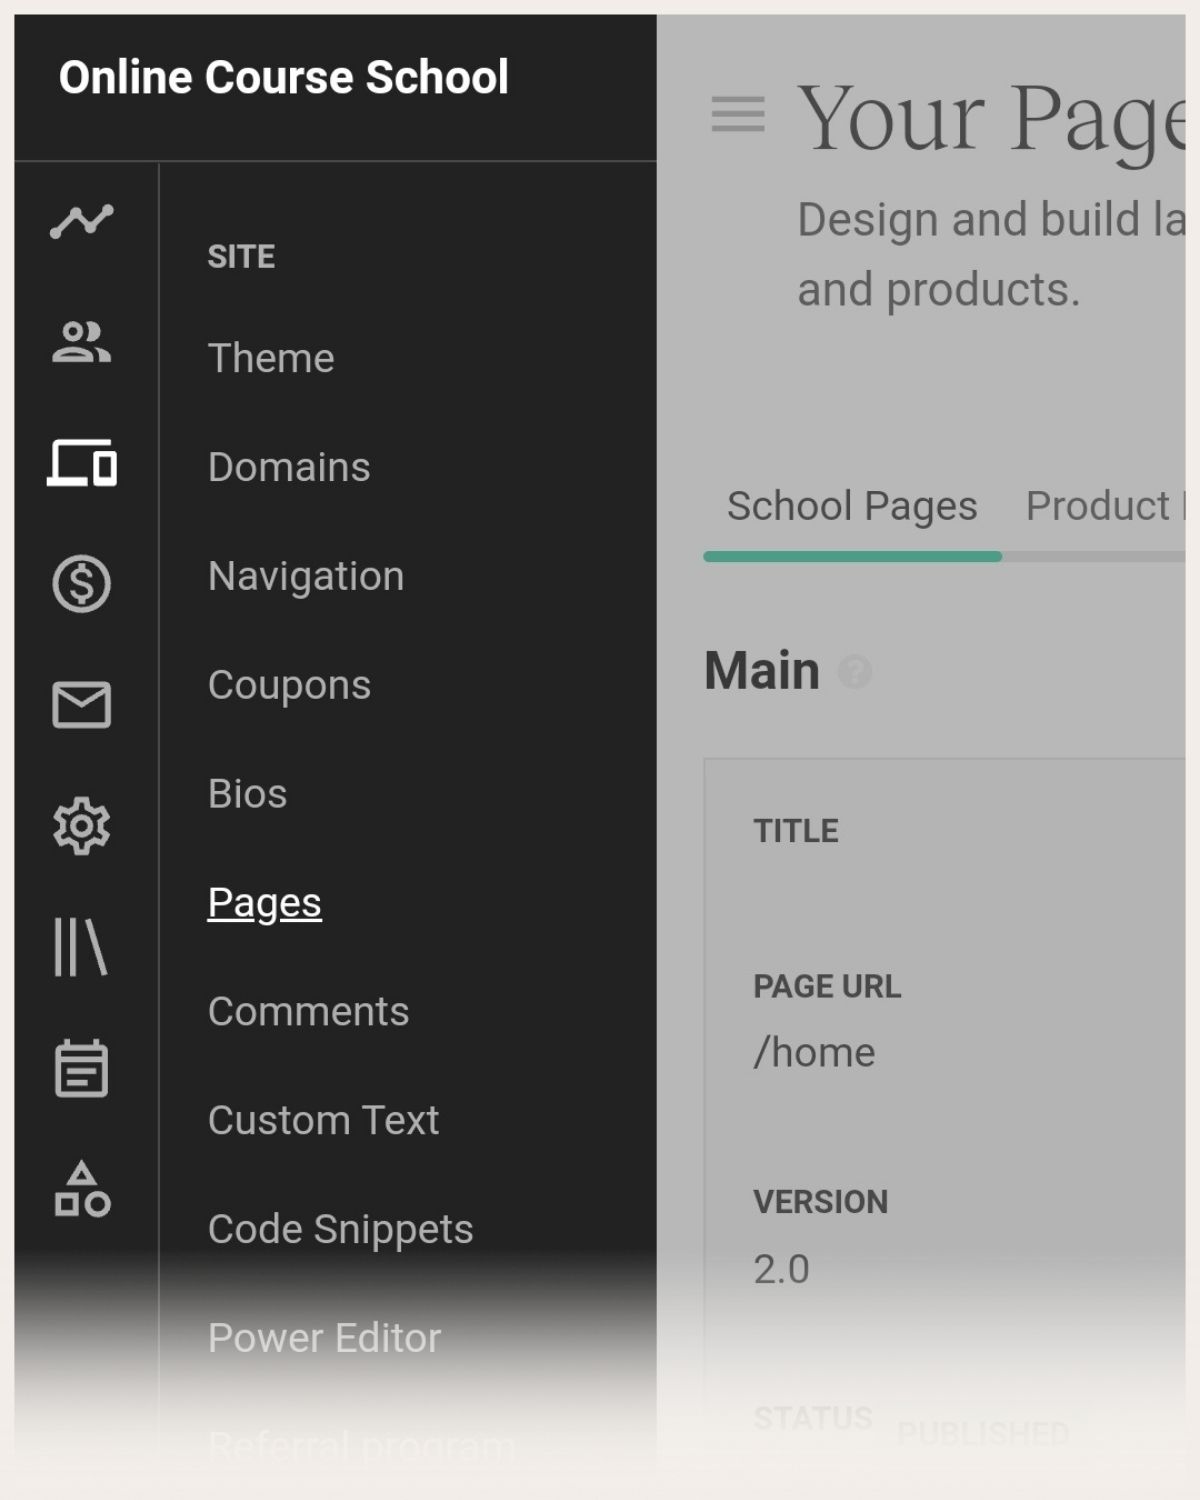
Create your pages
Before you start selling your course, you need to set up a few pages. And to create them, head over to “Site” and click on “Pages”.

Here you have two views, “School pages” and “Product pages”.
Hover to “School pages” to set up your homepage and your Terms and Conditions and Privacy Policy. You can also add other pages, if needed (such as an About page or Contact page).
To set up your product pages, go to “Courses” and click on “Pages” (the page editor in the “Site” tab doesn’t allow you to edit all your course pages).
Here you can set up your course-related pages; your sales page, checkout page, and thank you page. You’ll need all of these pages to sell your course.
Fortunately, Teachable’s page builder is a drag-and-drop tool, so you don’t need any tech skills to build beautiful web pages.
First, you have your sales page. If you’re unsure of how to create a profitable sales page, you can grab my proven sales page templates in my course Sold-Out Sales Page.
And as to your checkout and thank you pages, Teachable offers templates, which make it really easy for you to set up these pages. Just follow the instructions and you’re done.
Optimize your course
Teachable offers a lot of room for customization.
If you have a paid account, you’ll want to set up your own custom domain. To do that, go to “Site” and “Domains”. Here’s a good overview of how to set up your domain.

You can also modify your site navigation to control what students see in the navigation bar.
In the “Site” section you can add some fun ways to increase your course sales, such as coupons and referral programs. However, remember that when you’re setting up your first course, your focus should be on making your first sales and that’s not something these tools will help you achieve.
Plus, if you really want to create a custom experience, you can add custom code. But for most first-time course creators, this definitely isn’t something you should spend time on right now. Those features are for more advanced course creators who are already successfully selling their courses.
Set up emails
If you have a paid account, you can set up emails in Teachable. Emails can really help you create a great customer experience so take time to set these up. For example, welcome them to the course and send notifications whenever you update something in the course.
To create a welcome email, use this template:
Welcome to [your course]!
[Tell your students about the result they can get by implementing your course to make them excited about getting started with it.]
In these [X] classes, I will share the step to [whatever it is you teach].
Here’s an overview of [your course]:
[Walk your students through how they should use your course, for instance, “each lesson is completed with a quiz that opens up the next lesson for you.”]
[Sign-off]
Congrats, now you’re ready to publish your course!
But how do you create a success-focused course? And how do you sell it?
My course Ultimate Course Launch teaches you how to create a highly profitable course. Sign up here to learn more:
Over to you!
There you have it! That’s how you use Teachable. With this Teachable tutorial, you’ll have your course set up in no time so that you can focus on selling it and building your course business.
Next, let me know in the comments below:
What type of course are you creating?
I’d love to know!